Environments
An environment is where an application runs.
It belongs to a project, and it sits on one cluster. The list puts the environment name and the project in two columns. On the environment page the switcher shows them together. Project demo and environment dev appear as demo/dev.
The cluster is one you already brought into Door Hub: imported from AWS, GCP, or Azure, added with Manually Add Cluster, or created with Door Kubernetes Service. A project can have several environments, each on its own cluster, including clusters on different clouds. Each environment stays on the one cluster you picked for it.
People reach that environment through their project role. See Access.
Name the pair
Pick the project and the environment name before you open the form. dev and prod are ordinary names. The type on the form is separate: it starts on Development, and the other side is Production. The list shortens those to Dev and Prod.
Use one environment per stage. A project can own several, each on its own cluster.
The form refuses a save with these messages:
| Message | What is missing |
|---|---|
| Enter an environment name. | Name |
| Select a project. | Project |
| Select a cluster. | Cluster |
When the row says Not Available
STATUS on this page follows the cluster. Not Available means the console cannot reach that cluster, so Resources stays on No resources loaded yet and a deploy cannot land there.
Go back to Hub Clusters. Install the agent if you have not, and wait until that cluster says Ready. Editing the environment name does not fix a cluster the console cannot reach.
Do this
- Sign in at https://door.cloud and select your organization.
- Have a cluster the console can reach. Not Available on Hub Clusters means an application cannot deploy there yet.
- Open Environments. The page says Manage your environments. The page is
/cloud/environments. The demo organization already has project demo and environment dev. - If the project does not exist yet, click + New Project, enter Project Name, and click + Add Project. Cancel closes the dialog.
- Click New Environment. Set the name, the project, and a cluster the form will accept. Type starts on Development. Maya AI starts on Don't Allow. Add Environment creates it. Cancel returns to the list. This walkthrough stops on the form.
- Open the environment name. Deploy only when that cluster is available.
Deploying the application is Door DevOps.
The list
Environments lists each environment and the project that owns it.
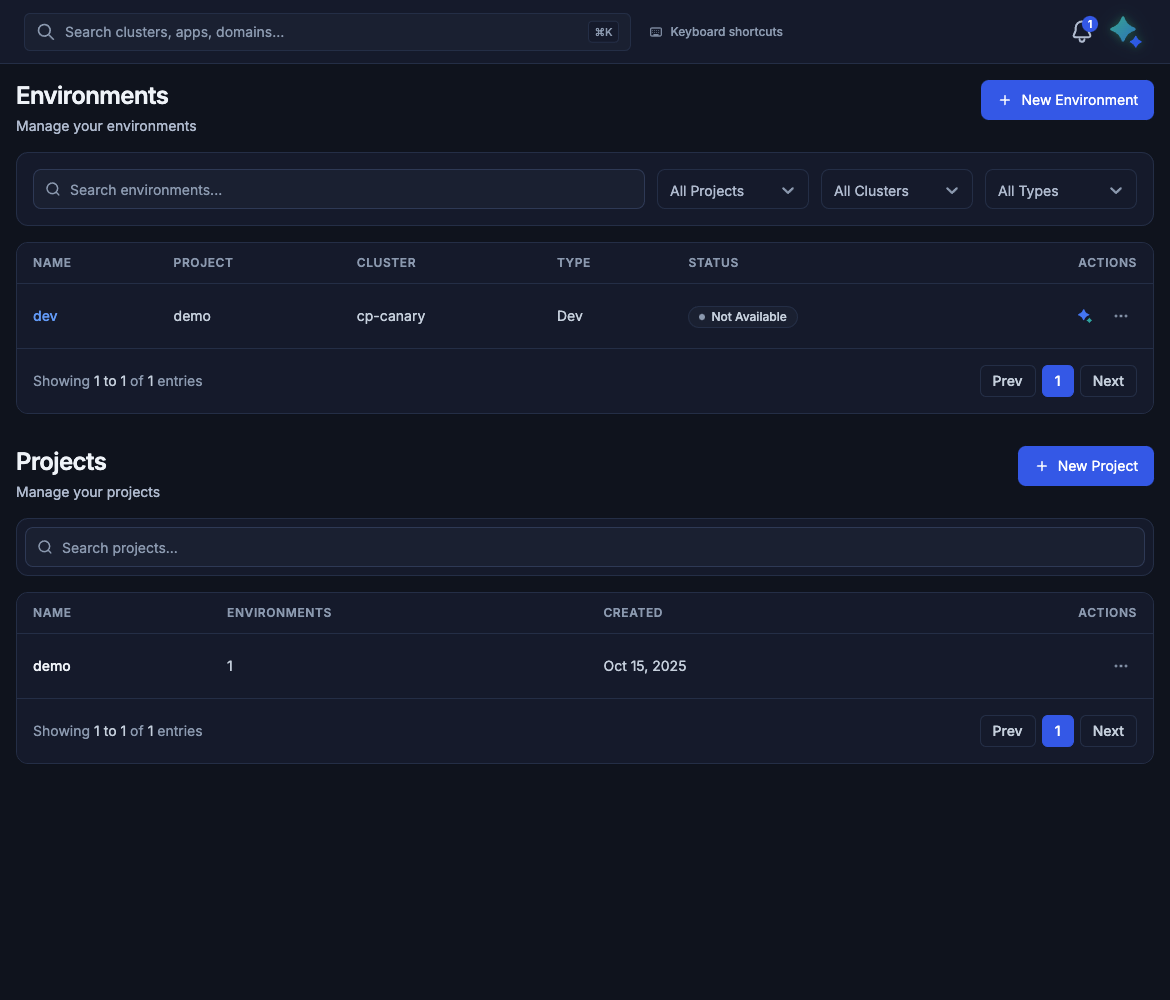
The demo organization has one environment: name dev, project demo, cluster cp-canary, type Dev, status Not Available. Not Available means the console could not reach the cluster in that screenshot. A ready cluster does not look like that.
| Column | Meaning |
|---|---|
| NAME | The environment name. The demo row is dev. |
| PROJECT | The project that owns the environment. The demo row is demo. |
| CLUSTER | The cluster the environment uses. The demo row is cp-canary. |
| TYPE | Dev on the demo row. The add form offers Development and Production. |
| STATUS | Whether the console can reach the cluster. An application cannot deploy into an environment whose cluster is not available. |
| ACTIONS | Edit opens Update Environment. Delete asks you to confirm Delete environment? |
Search the list, or filter with All Projects, All Clusters, and All Types. New Environment opens the add form.
The same page lists projects under Manage your projects.
| Column | Meaning |
|---|---|
| NAME | The project name. The demo project is demo. |
| ENVIRONMENTS | How many environments the project has. demo has 1. |
| CREATED | When the project was created. demo shows Oct 15, 2025. |
| ACTIONS | The actions for that row. |
+ New Project opens the dialog.
Add Project
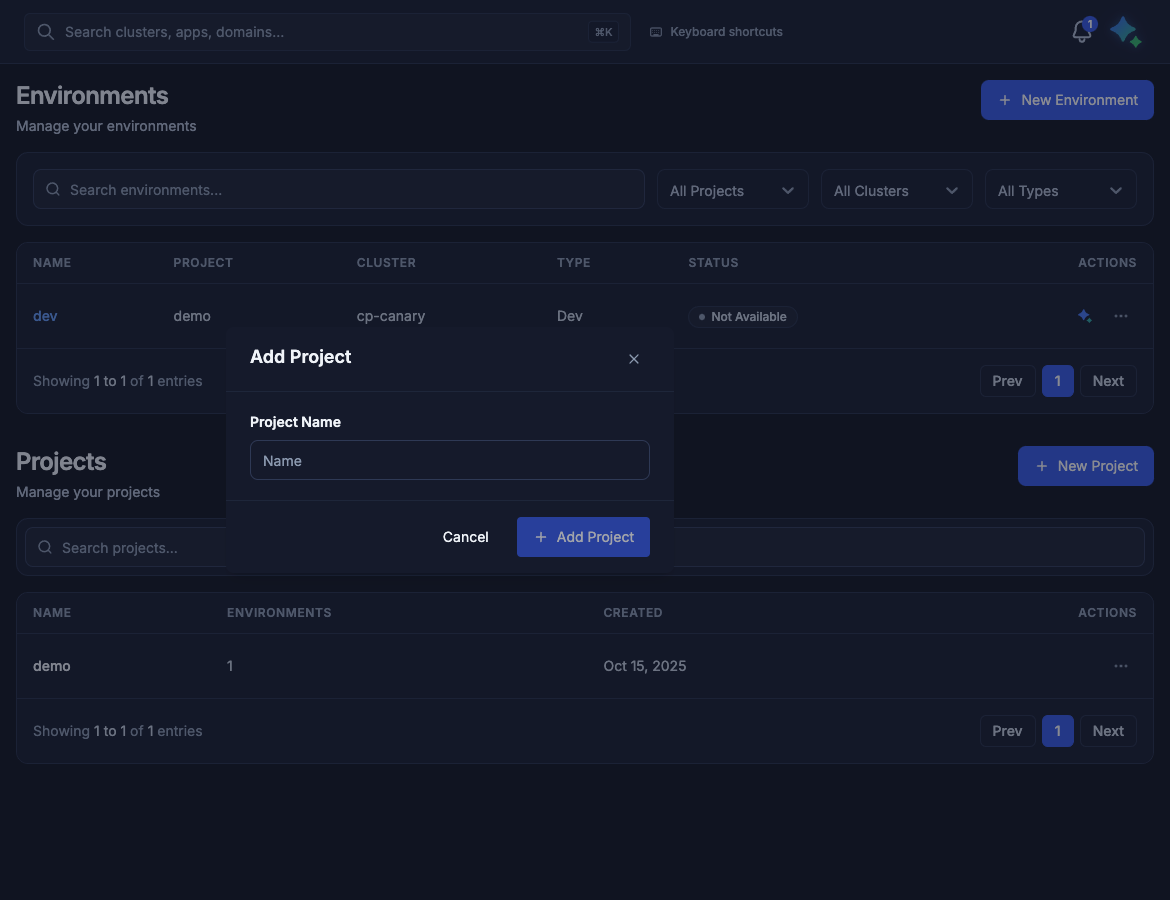
Project Name uses the placeholder Name. Cancel closes the dialog. + Add Project creates the project.
| Control | What it does |
|---|---|
| Project Name | The name. The placeholder is Name. |
| Cancel | Closes the dialog. |
| + Add Project | Creates the project. |
Add New Environment
The list button is New Environment. The page title is Add New Environment. The button that creates it is Add Environment. The page is /cloud/environments/new.
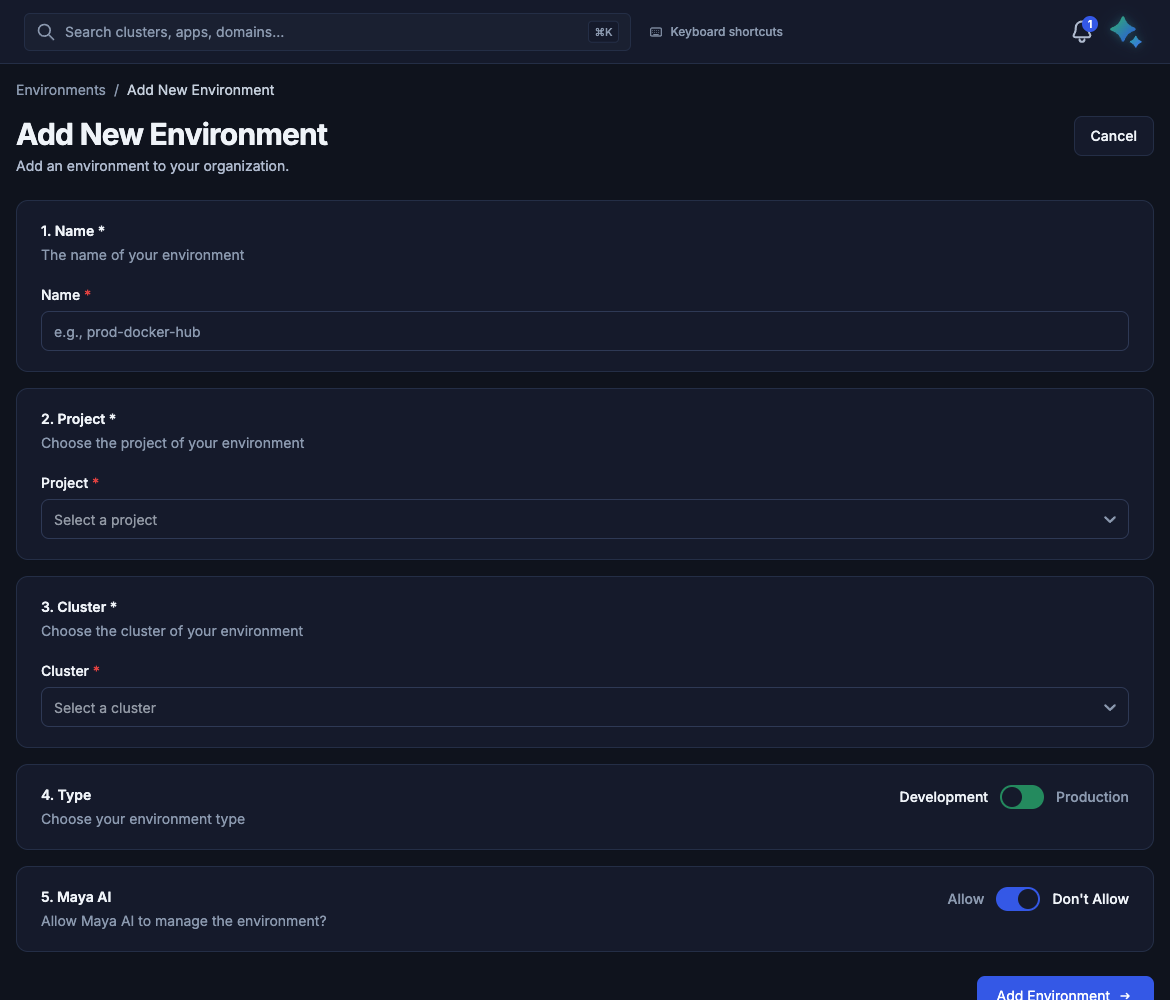
Name, project, cluster, type, and Maya AI. The name placeholder is e.g., prod-docker-hub. Add Environment creates the environment. This walkthrough stops before that button.
| Step | What you set |
|---|---|
| 1. Name | The name of your environment. The placeholder is e.g., prod-docker-hub. |
| 2. Project | Choose the project of your environment. The field starts at Select a project. Create the project first if this list is empty. |
| 3. Cluster | Choose the cluster of your environment. The field starts at Select a cluster. A cluster the console cannot use stays in the list and is disabled. The label adds — agent not connected, — not available, or — not ready. |
| 4. Type | Choose your environment type. It starts on Development. The other side is Production. |
| 5. Maya AI | Allow Maya AI to manage the environment? It starts on Don't Allow. Allow is the other side. |
The page title is Add New Environment. The line under it is Add an environment to your organization. Add Environment creates the environment. Cancel returns to Environments.
Update Environment
Edit on the row opens Update Environment. The button that saves it is Update Environment. Type is Development or Production. Maya AI is Allow or Don't Allow. Delete on the row asks you to confirm Delete environment?
Inside the environment
Open the name dev.
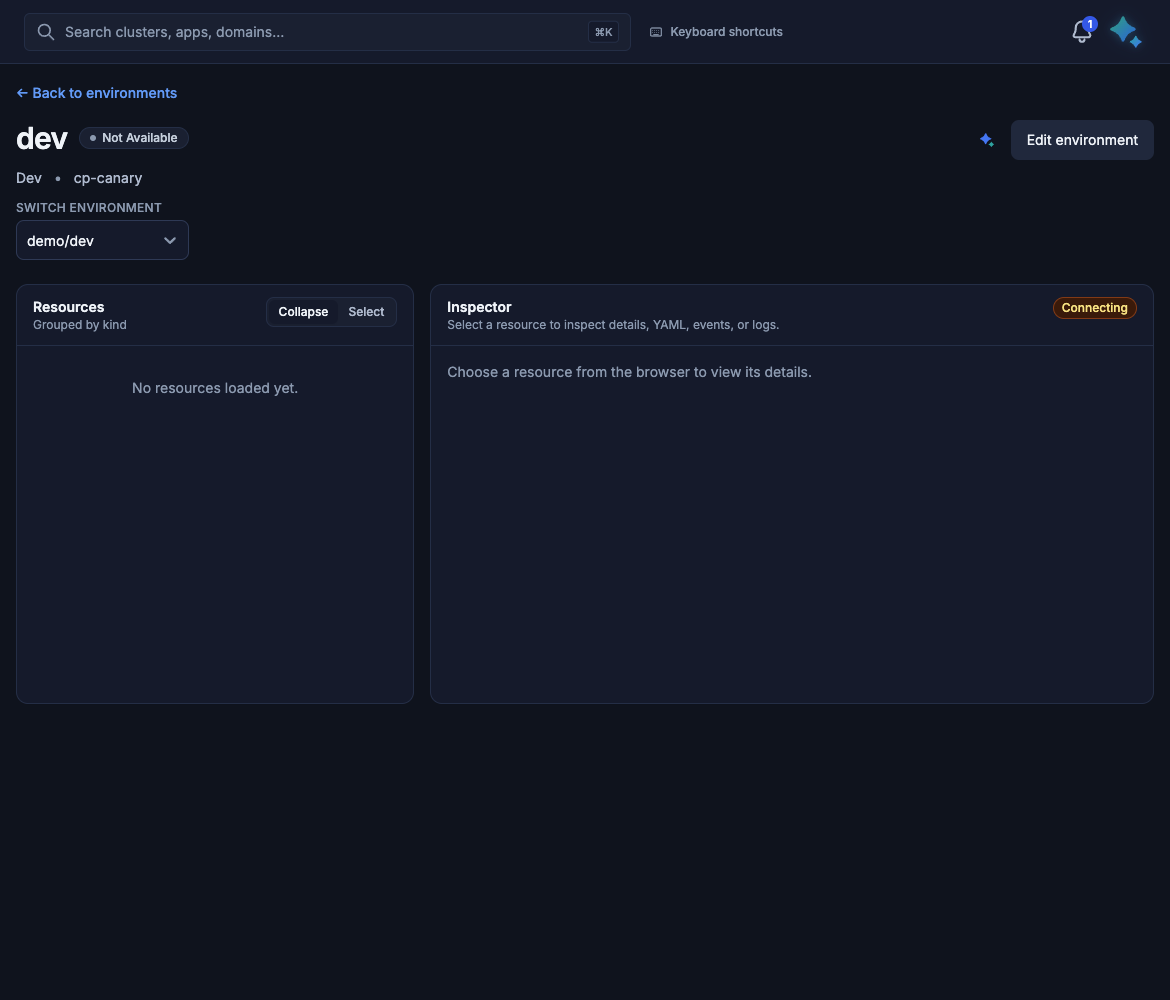
Title dev, badge Not Available, line Dev · cp-canary, switcher demo/dev. Resources say No resources loaded yet. The inspector is Connecting.
| On the page | What you see |
|---|---|
| Back to environments | Returns to the list. |
| Switch environment | demo/dev in the screenshot. |
| Edit environment | Opens Update Environment. |
| Title | dev, with the badge Not Available. |
| Under the title | Dev · cp-canary. |
| Resources | Grouped by kind. The card is empty: No resources loaded yet. Collapse and Select are on the card. |
| Inspector | Select a resource to inspect details, YAML, events, or logs. The badge is Connecting. |
The resource list stays empty while the console cannot reach the cluster.
Kubernetes view
Resources is the Kubernetes view of that environment, not the whole cluster. The groups are the kinds in that environment.
| Group | Kinds |
|---|---|
| Workloads | Deployments, StatefulSets, DaemonSets, ReplicaSets, Jobs, CronJobs, Pods |
| Networking | Services, Ingresses, HTTPProxies |
| Config & storage | ConfigMaps, Secrets, PVCs |
| Autoscaling | HPAs |
Select a resource. The inspector tabs are Overview, YAML, Events, and Logs. The resource actions are Scale, Change image, Rollout restart, Patch, and Delete. Which of these appear depends on the kind.
Registry
The registry is not part of creating an environment. Door DevOps stores the image there, and a Super Admin connects it. The fields are in Registry, for a Super Admin.