Applications
Apps in the sidebar opens Applications, the workloads deployed in this organization.
Do this
On Home, Deploy App opens New Deployment at /apps/new. Add Code is a different page.
-
Open Apps. The title is Applications. The line under it is Overview of your deployed applications.
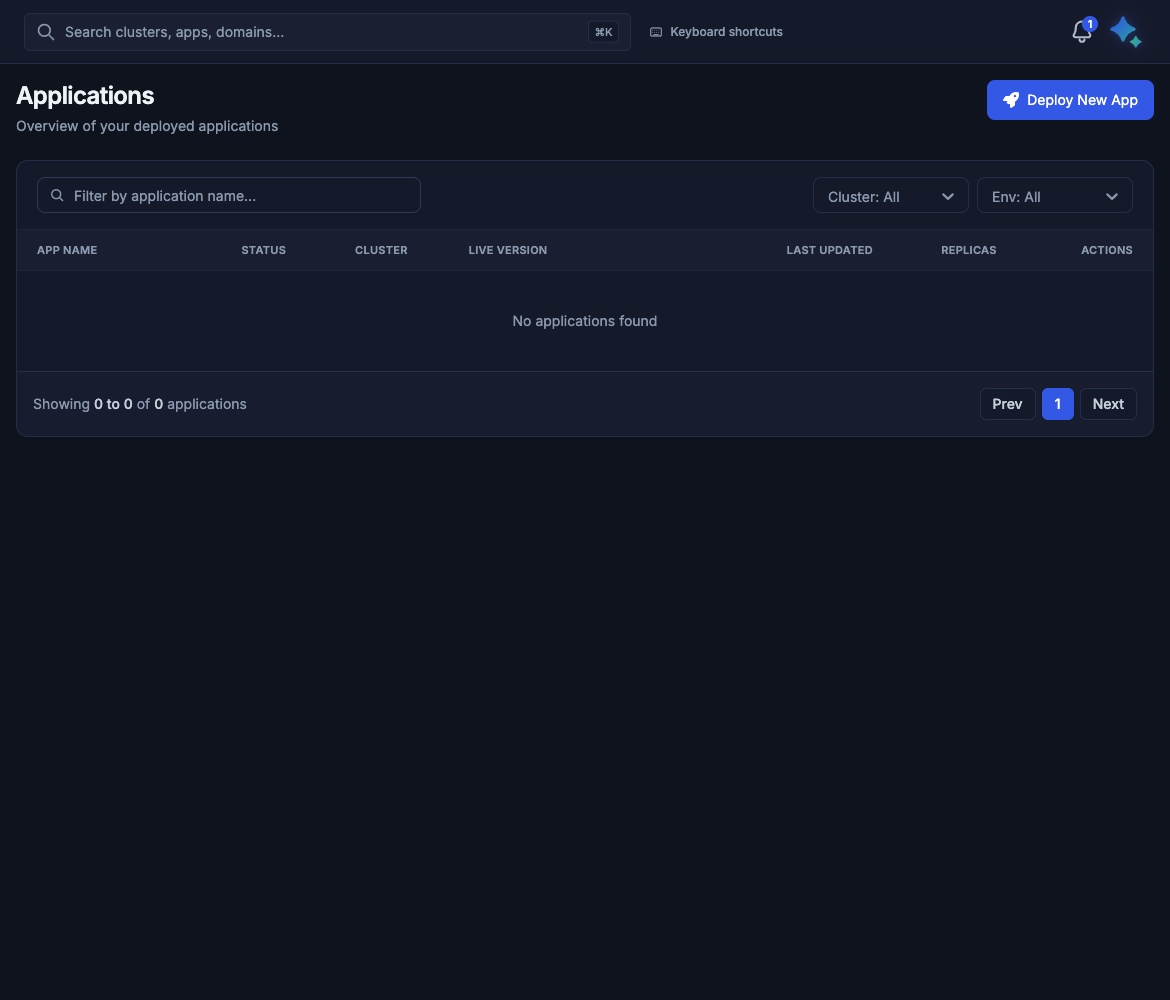
Applications in the demo organization. The table is empty. Your page lists your own applications.
-
Click Deploy New App. The page title is New Deployment. The line under it is Deploy your application from various sources. Cancel Deployment leaves the page without deploying.
From a code
Code is already selected. Helm and Door Services show Coming Soon and stay disabled.
- Under Select a Code, pick a code that has a build that succeeded. With no code yet, the form says You don't have any codes yet. Add Code to connect a repository before deploying.
- Under Select Branch & Commit, pick the commit. Until a code is selected, that field says Select a code first.
- Under General, set Name and Environment. Set App Port to the port the process listens on. This form defaults to 80. On Add Code the port defaults to 8080. A generated Node or Next.js image often listens on 3000. Python often listens on 8000 or 5000. Go, Java, PHP, and static images often listen on 8080. See Dockerfile and the build.
- Leave Public Exposure, Websocket?, and Auto Deployment off unless you need them.
-
Click the green Deploy. Configure opens the next step after the general step is valid. That step is described below. The screenshots stop on the general step.
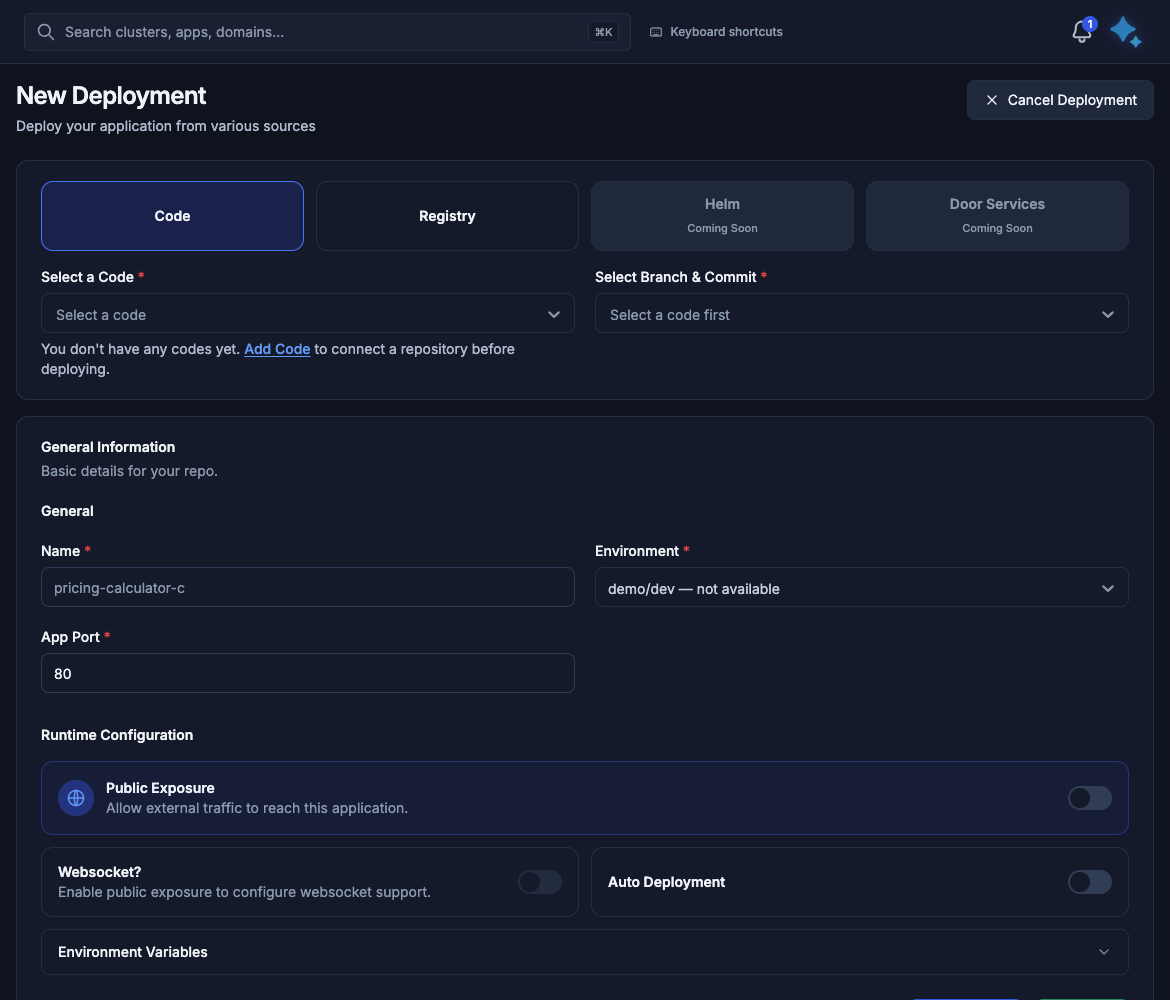
New Deployment from Code in the demo organization. There is no code yet. Name shows the placeholder
pricing-calculator-c. Environment shows demo/dev — not available because that cluster was not reachable when the screenshot was taken. Choose an environment whose cluster is reachable. See Environments and registry.
If you already used Build & Deploy on Add Code and selected an environment, Door creates the application when that first build succeeds.
From a registry
Registry deploys an image that is already built.
- Click Registry.
- Under Select a registry, pick the registry. The demo organization shows Harbor (default).
- Set Name, Environment, Image, and App Port. App Port defaults to 80. Set the port the process listens on. Version stays on Enter an image first until Image is set.
-
Click the green Deploy.
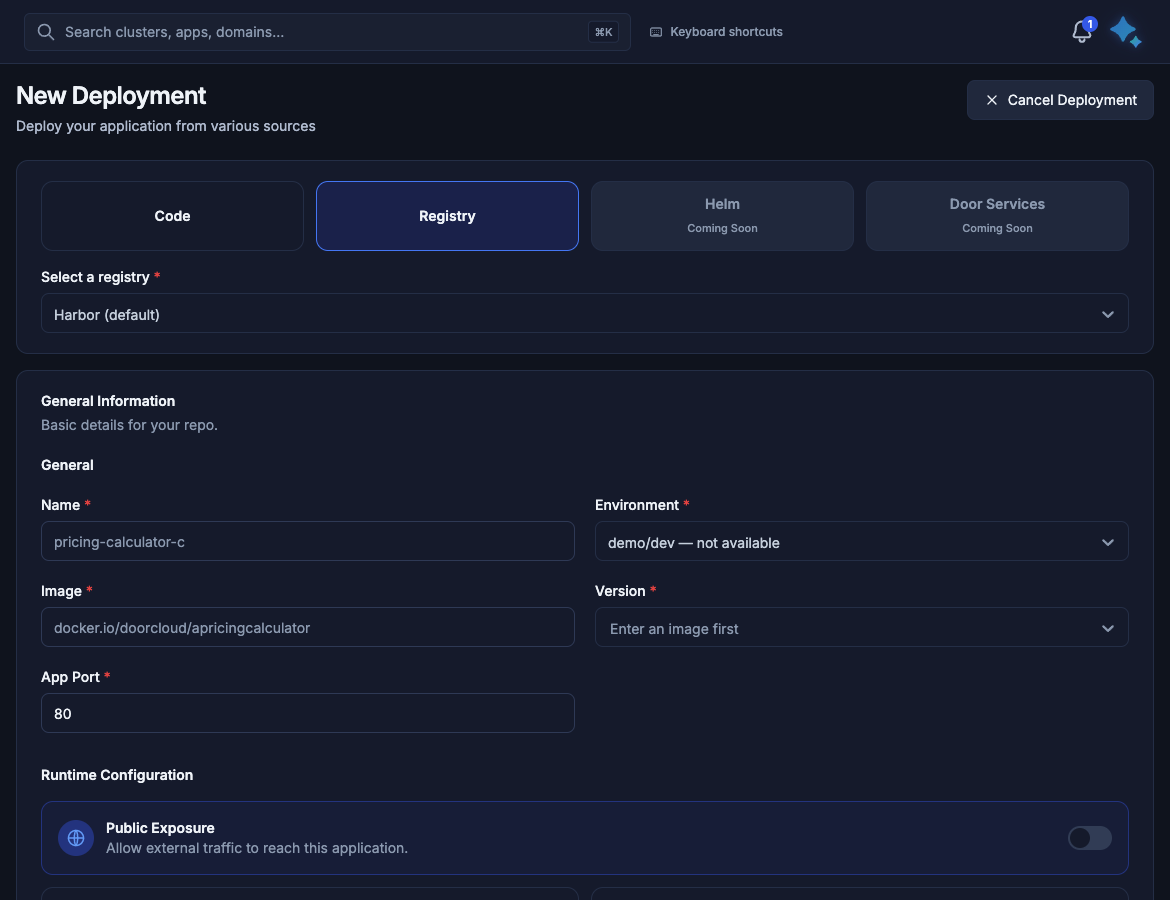
Registry source in the demo organization. Name shows the placeholder
pricing-calculator-cand Image shows the placeholderdocker.io/doorcloud/apricingcalculator. Those strings are placeholders, not a real application. Version stays on Enter an image first. demo/dev — not available is this demo environment while its cluster was unreachable.
Everything on this screen
Applications
The demo table is empty. Columns below are the ones on the page. The row menu, for when an application exists, is under When the application is running.
| On the page | What you see |
|---|---|
| Title | Applications |
| Subtitle | Overview of your deployed applications |
| Deploy New App | Opens New Deployment at /apps/new. |
| Filter | Filter by application name |
| Cluster | Defaults to All. |
| Env | Defaults to All. |
| APP NAME | The application name. |
| STATUS | Whether it is running. |
| CLUSTER | The cluster of the environment. |
| LIVE VERSION | The image tag that is running. |
| LAST UPDATED | When that version was deployed. |
| REPLICAS | How many copies are running. |
| ACTIONS | The row menu: Configure, K8s Workload, Duplicate, Delete. |
| Empty table | No applications found |
| Footer | Showing 0 to 0 of 0 applications, with Prev and Next. |
New Deployment
The section title is General Information. The line under it is Basic details for your repo.
| Source | State |
|---|---|
| Code | Available. Needs a code with a succeeded build. |
| Registry | Available. Deploys an image from a registry. |
| Helm | Coming Soon. Disabled. |
| Door Services | Coming Soon. Disabled. |
Code
| Field | What you enter |
|---|---|
| Select a Code | A code with a succeeded build. Empty state: You don't have any codes yet. Add Code to connect a repository before deploying. |
| Select Branch & Commit | The branch and commit. Until a code is selected, the field says Select a code first. |
| Name | The application name. |
| Environment | Shown as project/environment. In the demo screenshot the value is demo/dev — not available, because that cluster was not reachable. Pick an environment whose cluster is reachable. |
| App Port | Defaults to 80 on this form. Add Code defaults to 8080. Use the port the process listens on. |
| Generated image | Port it often listens on |
|---|---|
| Node, Next.js | 3000 |
| Python | 8000 or 5000 |
| Go, Java, PHP, static | 8080 |
Registry
| Field | What you enter |
|---|---|
| Select a registry | The registry that holds the image. The demo lists Harbor (default). |
| Name | The application name. The placeholder in the screenshot is pricing-calculator-c. That string is a placeholder, not a real application. |
| Image | The image reference. The placeholder in the screenshot is docker.io/doorcloud/apricingcalculator. That string is a placeholder, not a real application. |
| Version | The tag. The field says Enter an image first until Image is set. |
| Environment | Same list as on the code form. |
| App Port | Defaults to 80. Use the port the process listens on. |
Runtime configuration
These sit under Runtime Configuration on the general step. They start off.
| Control | Default | On the form |
|---|---|---|
| Public Exposure | Off | Allow external traffic to reach this application. |
| Websocket? | Off, and disabled until public exposure is on | Enable public exposure to configure websocket support. On Add Code the same switch is labeled Is it a websocket? |
| Auto Deployment | Off | A switch under Runtime Configuration. |
| Environment Variables | Collapsed | Its own button on this page. Open it for the variables the process sees at runtime. |
Public exposure
Turn Public Exposure on to set the address.
| Field | What it is |
|---|---|
| Subdomain | The left part of the host name. |
| Root Domain | The domain Door publishes on. In the demo the value is cp-canary-demo.door.africa. |
| URL | The subdomain, a dot, then the root domain. |
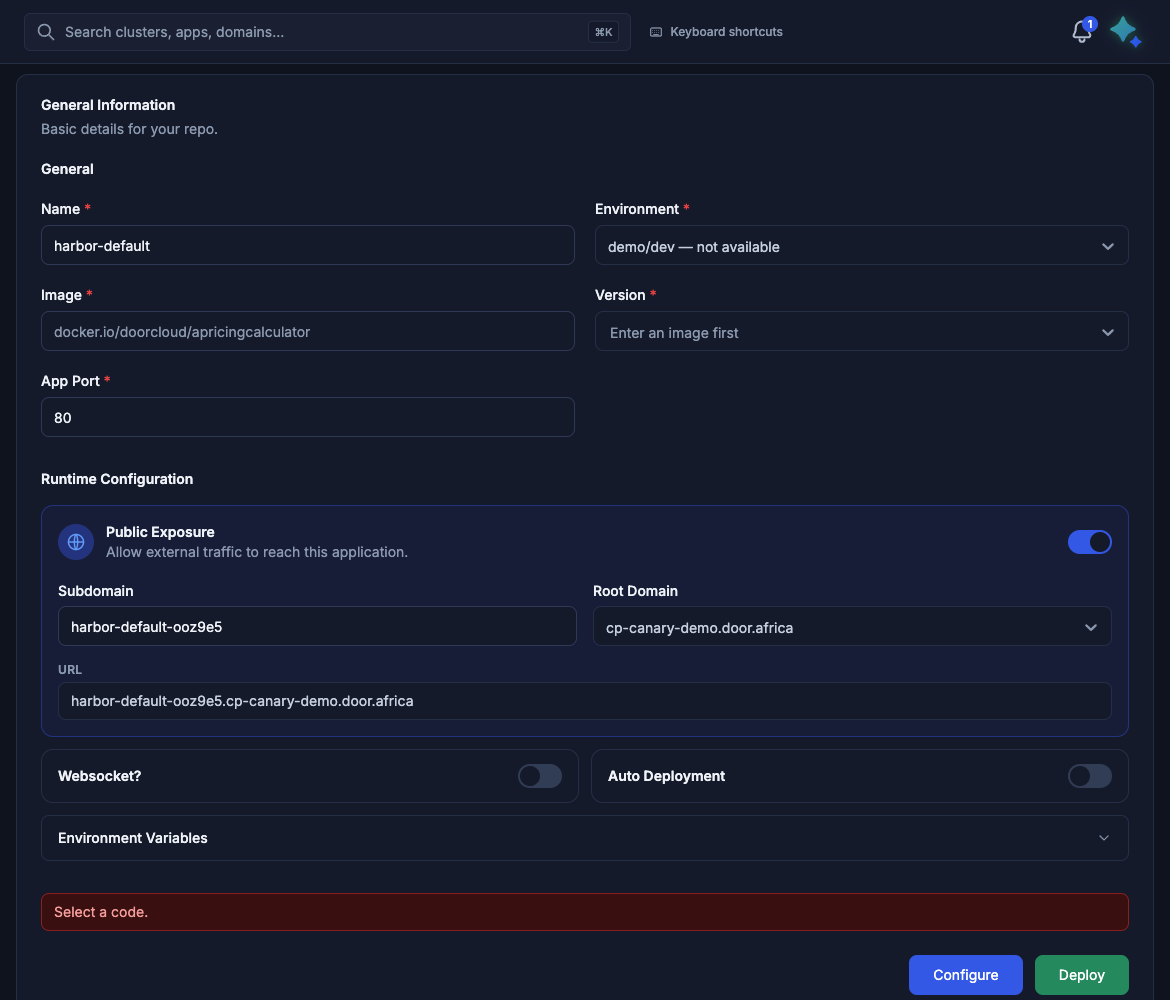
Public exposure on New Deployment. URL is the subdomain, a dot, and the root domain. The root domain in the picture is cp-canary-demo.door.africa. The name filled on that visit is an example. The red Select a code. is from the same visit: registry fields were filled and no code was selected. Deploy was not clicked.
Websocket? can be turned on after public exposure is on. Configure and the green Deploy sit at the bottom of this form.
Public Exposure publishes under a domain Door already attached to that cluster. In the demo screenshot the root domain is cp-canary-demo.door.africa. Leave it off when the hostname you want is one your organization owns. Register that hostname in Door APIM after the application is running, and point the endpoint at this service.
The next step
This guide has no screenshot of the step after the general step. Configure opens it once the general step is valid.
| Section | How it starts |
|---|---|
| Environment Variables | Empty. |
| Volumes | None. |
| Resources (CPU & GPU) | Empty until you set them. |
| Auto Scaling (HPA) | Off. When you turn it on, the form shows a minimum of 2, a maximum of 10, and a target of 75%. |
| Probes | Off. When you turn them on, liveness uses /healthz and readiness uses /ready. |
Node Selectors, Args/Commands/Lifecycle, Container Security Context, Pod Security Context, and Tolerations are on that step, in the advanced group. Leave them empty unless you were given values.
The button that installs the application is the green Deploy.
When the application is running
The demo organization has no application, and this guide has no screenshot of one. Open a row and the address is /apps/ followed by the application id. These are the labels on that page, and on the list, when an application exists.
The breadcrumb is Apps. The actions are Refresh, Configure, Upgrade Version, and Scale.
Scale opens a dialog with Replicas. Upgrade Version opens a dialog with Version and Select a version.
App Info
| Field | What it shows |
|---|---|
| Current Image | The image the application is running. |
| Live Version | The version that is live. |
| Project/Environment | The project and environment. |
| Cluster | The cluster. |
| Status | Live while the application is running. |
| Replicas | How many copies are running. |
| Created At | When the application was created. |
Endpoints, logs, and events
Endpoints lists Public (HTTPS) or Public (HTTP), and Internal Service. Copy copies an address. With nothing published, the block says No endpoints exposed.
Logs has a search box, Search logs…. Recent Events has columns Time, Type, Reason, and Message.
If the deployment failed
When the install has failed, the page shows Deployment failed, with Reconfigure, Refresh status, and Analyze with Maya.
Row menu
On the Applications list, the row menu is Configure, K8s Workload, Duplicate, and Delete.
Delete uses Delete deployment, Force delete, and Retry force delete.
Kubernetes workload
K8s Workload opens /apps/workloads. The tabs are Overview, YAML, Pods, Logs, Events, Network, and Storage. The action on that page is Restart.
What this does not do
- Helm and Door Services stay on Coming Soon and cannot be selected.
- A successful build leaves an application that is already installed on its current version. Update it with Upgrade Version, with a later deploy, or with Auto Deployment. The first Build & Deploy is the other case: when you selected an environment on Add Code, Door deploys after that first build succeeds.
- This page does not promote an application from one environment to another. A production application is a separate deploy into a production environment. See Environments and registry.
- Blue/green, canary, and A/B are not buttons on these screens.